Rights
This option permits to
manage the rights of: roles, applications, application menus, application
activities, web components and content types.

Figure 8.5.1
On the field to the
right of Modify rights of, select the
rights to manage. According to the selection, different fields will be opened.
Managing role rights
When selecting Roles
rights, the following screen will be displayed:
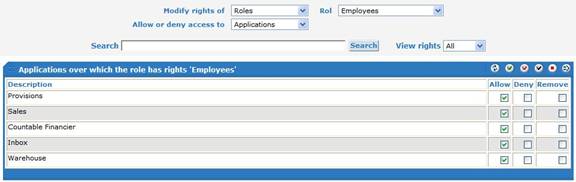
Figure 8.5.2
On the field to the
right of Role, select the
role for which rights will be defined.
Next, Allow or deny
access to will be displayed.
On the right, select whether you will define rights on: applications, menus, activities, web
components or content types.
For example, if you
select Applications, all applications on which the selected role has rights
will be listed, whether rights are allowed or denied.
To refine the search,
enter part of the description of what is being listed on the right of Search, then click on the ‘Search' button.
Applications, menus
and activities may have rights denied. So, view rights
is enabled for them. On the right you may select to view all rights,
whether allowed or denied.
Next, we will look at
how the list works and continue with the example of applications.
For applications on
which the selected role has rights, the Allow column is checked (![]() ),
otherwise this column is not checked (
),
otherwise this column is not checked (![]() ).
).
For applications
denied for the selected role, the Deny
column is checked, otherwise this
column is not checked.
Users with an assigned
role that has certain applications with the Allow column checked, will have
access to such applications. But if these users have any other role assigned
that has certain applications with the Deny column checked, then this right
will prevail, and they will therefore not be able to access any of the denied
applications.
The actions enabled
from here are:
·
Allow: is used to assign a right, by clicking to
check the box the right is assigned, by clicking again the box is unchecked and
the right is not assigned.
·
Deny: is used to deny a right, by clicking to check
the box the right is denied, by clicking again the box is unchecked and the
right is not denied.
·
Remove: is used to remove a right, by clicking to
check the box the right is removed, by clicking again the box is unchecked and
the right is not removed.
·
Allow
all or none ![]() : to
allow rights to all the elements on the list, click on the left button of the
mouse and all the Allow column will be checked. In order not to grant rights to
any element on the list, click on the right button of the mouse and all the Allow
column will be unchecked.
: to
allow rights to all the elements on the list, click on the left button of the
mouse and all the Allow column will be checked. In order not to grant rights to
any element on the list, click on the right button of the mouse and all the Allow
column will be unchecked.
·
Deny
all or none ![]() : to
deny rights to all the elements on the list, click on the left button of the
mouse and all the Deny column will be checked. In order not to deny rights to
any element on the list, click on the right button of the mouse and all the
Deny column will be unchecked.
: to
deny rights to all the elements on the list, click on the left button of the
mouse and all the Deny column will be checked. In order not to deny rights to
any element on the list, click on the right button of the mouse and all the
Deny column will be unchecked.
·
Remove
all or none ![]() : to
remove rights from all the elements on the list, click on the left button of
the mouse and all the Remove column will be checked. In order not to remove
rights from any element on the list, click on the right button of the mouse and
all the Remove column will be unchecked.
: to
remove rights from all the elements on the list, click on the left button of
the mouse and all the Remove column will be checked. In order not to remove
rights from any element on the list, click on the right button of the mouse and
all the Remove column will be unchecked.
·
Save ![]() : click
on this button to save changes. Otherwise, all changes will be lost.
: click
on this button to save changes. Otherwise, all changes will be lost.
·
Select ![]() : to
add new elements to the list to be assigned rights, click on this button and
the following screen will be displayed:
: to
add new elements to the list to be assigned rights, click on this button and
the following screen will be displayed:
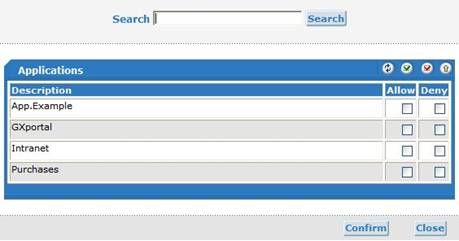
Figure 8.5.3
Following with the example of applications, all applications with no
rights defined for the selected role will be listed, being possible to Allow or
Deny by checking the corresponding column.
The Allow all or none (![]() ) and Deny
all or none (
) and Deny
all or none (![]() ) buttons
also have the feature described above.
) buttons
also have the feature described above.
The Assign (![]() ) button
assigns the rights defined and adds them to the list of applications that have
rights defined for the selected role. These applications disappear from the
current list. This window remains open to continue assigning rights.
) button
assigns the rights defined and adds them to the list of applications that have
rights defined for the selected role. These applications disappear from the
current list. This window remains open to continue assigning rights.
The Confirm button does the same as the Assign button, the only
difference being that this window is closed and you return to the previous
window.
If you select Menus or
Activities on the field on the right of Allow or deny access to, Application will be displayed. You must select on the right the
application of the Menus or Activites to which the right for the selected role
will be defined.
Managing
application rights
When selecting to
modify application rights, the label Application
will be displayed. On the field on
the right, you must select the application for which rights will be defined.
Once the application
is selected, all roles with rights defined on the selected application will be
listed, whether allowed or denied.
To refine the search,
you may enter part of the description of the role on the field to the right of Search, then click on the ‘Search' button. All roles
that fulfill the condition will remain on the screen.
On the field to the
right of View rights you may select to see all rights, the rights allowed or the rights
denied.
Rights may be
assigned, denied or removed in the way explained above.
Managing application menus rights
When selecting to
modify Applications – Menu rights, the
following screen will be displayed:
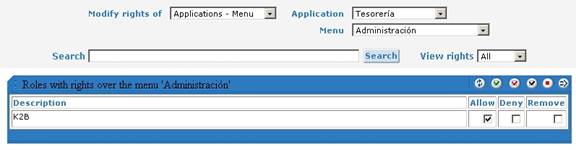
Figure 8.5.4
On the field to the
right of Application, select the
application of the Menu for which rights will be defined.
Next, Menu will be displayed and all Menus of the selected application
will be displayed on the right. You must select the corresponding menu.
Once the menu is
selected, all roles with rights defined on the selected menu will be listed,
whether allowed or denied.
To refine the search,
you may enter part of the description of the role on the field to the right of Search, then click on the ‘Search' button. All roles
that fulfill the condition will remain on the screen.
On the field to the
right of View rights you may select to see all rights, the rights allowed or the rights
denied.
Rights may be
assigned, denied or removed in the way explained for the first case.
Managing application activities rights
When selecting to
modify activities rights, the following screen will be displayed:
Figure 8.5.5
On the field to the
right of Application, select the
application of the activity for which rights will be defined.
Next, Activity will be displayed and all activities of the selected
application will be displayed on the right. You must select the corresponding activity.
Once the activity is
selected, all roles with rights defined on the selected activity will be
listed, whether allowed or denied.
To refine the search,
you may enter part of the description of the role on the field to the right of Search, then click on the ‘Search' button. All roles
that fulfill the condition will remain on the screen.
On the field to the
right of View rights you may select to
see all rights, the rights allowed or the rights denied.
Rights may be assigned,
denied or removed in the way explained for the first case.
Managing web component rights
When selecting to
modify web component rights, the following screen will be displayed:

Figure 8.5.6
On the field to the
right of Web Component, select the web component for which rights will be defined.
Next, all roles with
rights on the selected web component will be listed. In the case of web
components, there are no rights denied. When a web component is created no role
has access right to it until the corresponding right is assigned.
To refine the search,
you may enter part of the description of the role on the field to the right of Search, then click on the ‘Search' button. All roles
that fulfill the condition will remain on the screen.
Rights may be assigned
or removed in the way explained for the first case.
Managing content type rights
When selecting to
modify content type rights, the label Content Type will be displayed. On the field on the right, you must
select the content type for which rights will be defined.
Once the content type
is selected, all roles with rights defined on the content type selected will be
listed. In the case of content types, there are no rights denied. When a content
type is created no role has access right to it until the corresponding right is
assigned.
To refine the search,
you may enter part of the description of the role on the field to the right of Search, then click on the ‘Search' button. All roles
that fulfill the condition will remain on the screen.
Rights may be assigned
or removed in the way explained for the first case.