GXportal Authorization with GXProtection 2000
GXportal requires licenses to be used with its full functionality. The keys activation is based on a protection mechanism called ‘GXProtection 2000’.
GXportal uses protection per portal: this means that for each portal that you want to build you must contract a license. This license will allow you defining one user to access the Backend, which will be enabled to administrate the portal.
Besides, GXportal uses protection per additional users with roles to access the Backend: that is to say, if you want to define more users with roles concerning the portal building or maintenance, you will have to contract additional licenses, which will be assigned by the GXportal administrator user for each portal.
IMPORTANT: Regardless of whether you are a new GXportal user or not, you must authorize your GXportal product.
Once you have finished GXportal installation, you will have to run the GXPORTAL License Manager to obtain the rights to use the products.
Note: Licenses are not lost when uninstalling the product. They remain active in the PC where they were authorized. Before removing the product, it may be useful to backup the GXLmgr.exe to be able to uninstall, transfer, etc. the licenses afterwards.
To authorize GXportal you must run the GENEXUS License Manager program located in Gxportal programs menu, or the GxLMgr.exe located in the directory where Gxportal was installed (by default: C:\Program Files\ARTech\GXportal\LicMgr)
The following dialog will be displayed on running it:
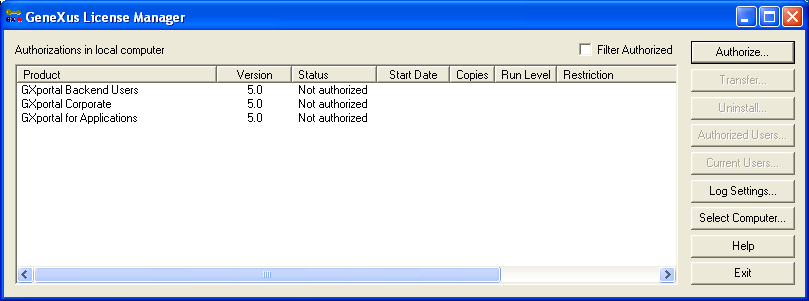
At the top you must indicate the place where the licenses are being taken from (this is setup in Select Computer).
All components requiring authorization corresponding to the product from which License Manager is being run are displayed in the box (the previous box corresponds to all GXportal components).
The current license status is shown for each component or product. It may have the following values:
If it is authorized, you can also visualize the starting date, the number of copies, the level of execution and constraints.
Authorize
Three types of authorizations can be granted:
-
Full Authorization (initial authorization)
-
Increase the number of users
-
Change constraints (e.g.: increase due date)
To execute any of these functions you must follow the steps below:
You may ask for the keys in 3 different ways. There follows the detail of each one of these possibilities and the steps required from the wizard:
Option 1. Request through the Web:
Step 1. Press Authorize.
Step 2. Select Request Licenses.
Step 3. Select Authorize by web.
Step 4. Select all the products to be authorized and Press Finish.
Step 5. A form will be displayed (in the web) to complete the request.
This is the recommended option if you have an Internet connection available.
Option 2. Send .gxa file:
Step 1. Press Authorize.
Step 2. Select Request License.
Step 3. Select Generate Authorization File.
Step 4. Select all the products to be authorized and Press Finish.
Step 5. You must send this file to your local distributor.
Option 3. Obtain site codes manually:
Step 1. Press Authorize.
Step 2. Select Enter License.
Step 3. Select Manual Authorization.
Step 4. The Site Code corresponding to each selected product will be displayed.
Once you have received the activation keys, you must proceed with the products activation. You have three options to activate the keys. If you receive the .gxa file with the keys, you can use any of the first two options. If you receive the codes directly (site keys), you must use the 3rd option.
Option 1. Automatic activation
Copy the file to a directory of the PC where the keys were requested and double click on it from that PC. After a while, a screen will be displayed indicating the operation status.
Option 2. Activation from License Manager
Step 1. Press Authorize.
Step 2. Select Enter Licenses.
Step 3. Select Authorize from file.
Step 4. Select the file and Press Finish. A screen will be displayed showing the operation result.
Option 3. Manual Authorization
If instead of receiving the .gxa file with the keys, you have received the site Key directly:
Step 1. Press Authorize.
Step 2. Select Enter License.
Step 3. Select Manual Authorization.
Step 4. Select one of the products to be authorized, enter the Site Key and Press Confirm.
Repeat the operation for each product to be authorized.
Note: Incrementing the number of users and changing constraints at the same time is not possible (with the same Site Code).
Direct Transfer
This option provides the possibility of transferring one or several options from a PC or protection server to another server located in the same network. The target server must be a protection server; i.e.: it must have the ‘ProtSrvService’ installed and started.
Steps to perform the transfer:
-
Get connected to the source PC; i.e.: through Select Computer, get connected to the location of the license to be transferred. If the license to be transferred is in a PC, the Direct Transfer must be performed from this PC. If the license is in a server, the transfer may be performed either from the target server or the source server.
-
Press the Transfer button in the License Manager, select the “Direct Transfer” option, enter the name of the target Server and the number of copies to be transferred and press OK.
-
If everything goes normal, a message will be displayed indicating so.
Remote Transfer
This method is used to transfer one or several licenses between any two machines. It may be between two servers, two PCs, a Server and a PC or vice versa.
Below you will find the 3 Steps to be followed to perform this type of transfer. They must be executed in the order they appear below.
Register Transfer
a. Run GXPORTAL License Manager in the target PC (where you want to install the license).
b. Select the product and press Transfer.
c.
Then select the Register Transfer option, enter the path and file name (with .trf extension) requested in the dialog; e.g.: A:\develop.trf, and press OK. Bear in mind that you can put registration files of several products in the same directory or diskette, indicating a different name for each of them.
Transfer Out
a. Run GXPORTAL License Manager in the source PC (where the license is currently).
b. Select the product (it must coincide with the one selected in the first Step) and press Transfer.
c.
Then select the Transfer Out option, select the number of licenses to be transferred, select the transfer file corresponding to the selected product and press OK. If everything goes normal a message will be displayed indicating so.
Transfer In
a. Run GXPORTAL License Manager in the target PC.
b. Select the product (it must coincide with the one selected in the first Step) and press Transfer.
c.
Then select the Transfer In option, select the transfer file corresponding to the selected product and press OK. If everything goes normal a message will be displayed indicating so.
Uninstall
You can uninstall any of the products that were previously installed.
For this, you must run GXPORTAL License Manager, select the product and press Uninstall. A dialog will be displayed that will allow you selecting the number of licenses you want to uninstall.
Once the action has been confirmed, the uninstall code is displayed. It must be sent to your Distributor.
Log Settings
The “log” is used to keep a trace of each operation performed, which will allow performing a diagnosis in case of failure.
In the setup you have the option of saving the trace or not. If you decide to save the Trace, the Log File will be used, and you can determine the log file path and name.
License expiration date reminder
If the product is authorized with temporary licenses, when there are 10 days left for the expiration date a screen reminding so will be displayed when running the application.
This may be useful to renew the license before its expiration.
On that screen you may choose the action you want to execute as from that moment. The possible values are:
Leave the reminder as-is
If you select this option, the message will continue appearing each time you use the product until the license expires or is renewed.
Dismiss the reminder
If you select this option the reminder will no longer appear.
Remind me again in n days
If you select this option the reminder will not appear until the selected day.
Constraints
Performing a Direct Transfer to a PC is not possible. In this case, you must use Remote Transfer. You can only perform a Direct Transfer to the server (from a PC or another server) with GENEXUS Protection Server installed.